**Title: Guide to Registering an Apple ID on iPhone**
Creating an Apple ID is essential for accessing various Apple services such as the App Store, iCloud, iTunes, and more. Here's a step-by-step guide on how to register an Apple ID directly from your iPhone:
### Step 1: Open Settings
Launch the Settings app on your iPhone. It's usually represented by a gear icon and can be found on your home screen.
### Step 2: Tap on "Sign in to your iPhone"
Scroll down and tap on the "Sign in to your iPhone" option. If you're already signed in with another Apple ID, tap on your name at the top of the screen and then tap on "Sign Out."
### Step 3: Choose "Don't have an Apple ID or forgot it?"
Below the login fields, you'll find an option that says "Don't have an Apple ID or forgot it?" Tap on it to proceed with creating a new Apple ID.
### Step 4: Tap on "Create Apple ID"
On the next screen, select the "Create Apple ID" option.
### Step 5: Enter your Birth Date
Enter your birth date using the scroll wheels. Tap "Next" when you're done.
### Step 6: Enter your First and Last Name
Input your first name and last name in the provided fields. Tap "Next" to proceed.
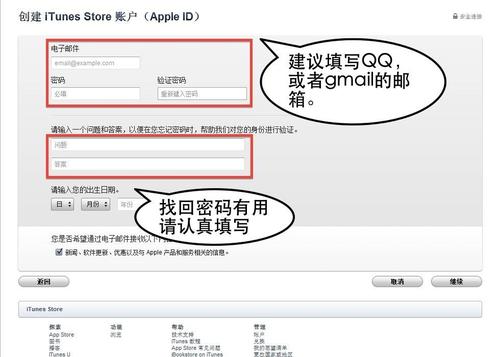
### Step 7: Set Up Your Email Address
You'll be asked to enter your email address. This will be used as your Apple ID. If you don't have an email address, you can create one for free using services like Gmail or Outlook.
### Step 8: Create a Password
Choose a strong password for your Apple ID. It should be at least eight characters long and include a combination of letters, numbers, and symbols.
### Step 9: Verify Your Password
Re-enter the password you've chosen to confirm it.
### Step 10: Choose Security Questions
Select three security questions and provide answers for them. These will be used to verify your identity in case you forget your password.
### Step 11: Agree to Terms and Conditions
Read through Apple's Terms and Conditions and Privacy Policy, then tap "Agree" at the bottom of the screen to proceed.
### Step 12: Verify Your Email Address
Apple will send a verification email to the address you provided. Check your email inbox and follow the instructions to verify your email address.
### Step 13: Sign In to iCloud (Optional)
After verifying your email, you may be prompted to sign in to iCloud. You can choose to do this now or later.
### Step 14: You're Done!
Congratulations! You've successfully created your Apple ID. You can now use it to access various Apple services on your iPhone.
### Tips for a Secure Apple ID:
1. **Use a Strong Password:** Make sure your password is unique and not easily guessable.
2. **Enable Two-Factor Authentication:** Add an extra layer of security to your Apple ID by enabling two-factor authentication. This will require you to verify your identity using a trusted device or phone number when signing in from a new device or browser.
3. **Keep Your Security Questions Secure:** Avoid using easily guessable answers for your security questions, and never share them with anyone.
4. **Keep Your Email Address Updated:** Ensure that the email address associated with your Apple ID is current so you can receive important notifications and reset your password if needed.
Follow these steps and tips to create a secure and hassle-free Apple ID on your iPhone, and enjoy seamless access to Apple's ecosystem of services.